Unable to live migrate VMs – cause ConfigStoreRootPath parameter

I had a problem, like a lot of other admins, caused by changing volumes in cluster. In my case the origin was a new storage device. After I moved all machines and other content to the new device, all the things were working well. The surprise arrived when I disconnected the old one –the live migrations simply stopped to work. Impossible? Well. Let’s go step by step.
The origin of the problem is the configuration of Veeam backup software as is described in Veeam KB2194: “If you have shared VHDX, you have to define ConfigStoreRootPath parameter…”. After the execution of PowerShell cmdlet, I was very happy – no warning in Veeam, backup was running – all was working perfect. At this point, I just want to remember that we are working with PowerShell on Microsoft cluster and adding Microsoft parameter (asked from Veeam).
Later, when I changed my SAN, both SANs were connected to my cluster. So, I had Volume1, Volume2 and Volume3 from the old SAN device and Volume4, Volume5 and Volume6 from the new SAN device. It couldn’t be different as I need to do storage migration. Let’s say that value of ConfigStoreRootPath is pointing to folder located on Volume1 (or some other volume on old SAN).
When I completed the migration, the last step was to disconnect the old SAN and this step broke the ConfigStoreRootPath configuration. Don’t panic; it is a PowerShell configurable value. Normally you can change it, but not in this case. You will receive an error as Microsoft did not predicted that this can be done. It is not possible to change or delete the value.
I opened a case on Microsoft and explained them what I did and ask them how to solve the problem. The answer was “Well, this is a Veeam parameter. It is actually configurable thru PowerShell and we support this configuration, but we do not support to change this value. Call Veeam.” Of course, I opened another case on Veeam and I had the answer: “Well, it is true that we use this setting, but it is a Microsoft setting and they should resolve this issue. It is not our problem.”
AT this point I was frustrated, but I found a “solution” on Microsoft forums. Microsoft engineer told me that it should work, but the problem is that you have to shutdown the entire cluster and change the configuration manually in Regedit. It didn’t work for me!
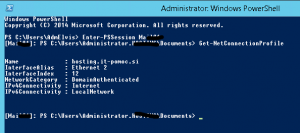
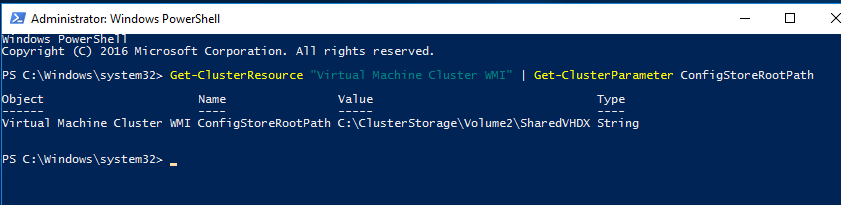
My solution: If you are not sure how it was originally configured, you can check it with PowerShell cmdlet: Get-ClusterResource “Virtual Machine Cluster WMI” | Get-ClusterParameter ConfigStoreRootPath

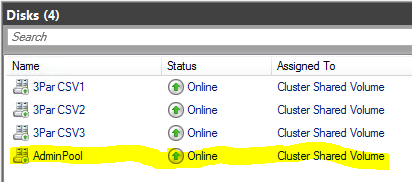
I don’t know if I can call it solution or maybe is better workaround. It. Is very simple to do it. I created a new LUN on storage – just 1GB, it doesn’t need to have a lot of space and present it to the cluster. I created a normal CSV volume as you can see on the picture, but for now don’t use it or put any file on it


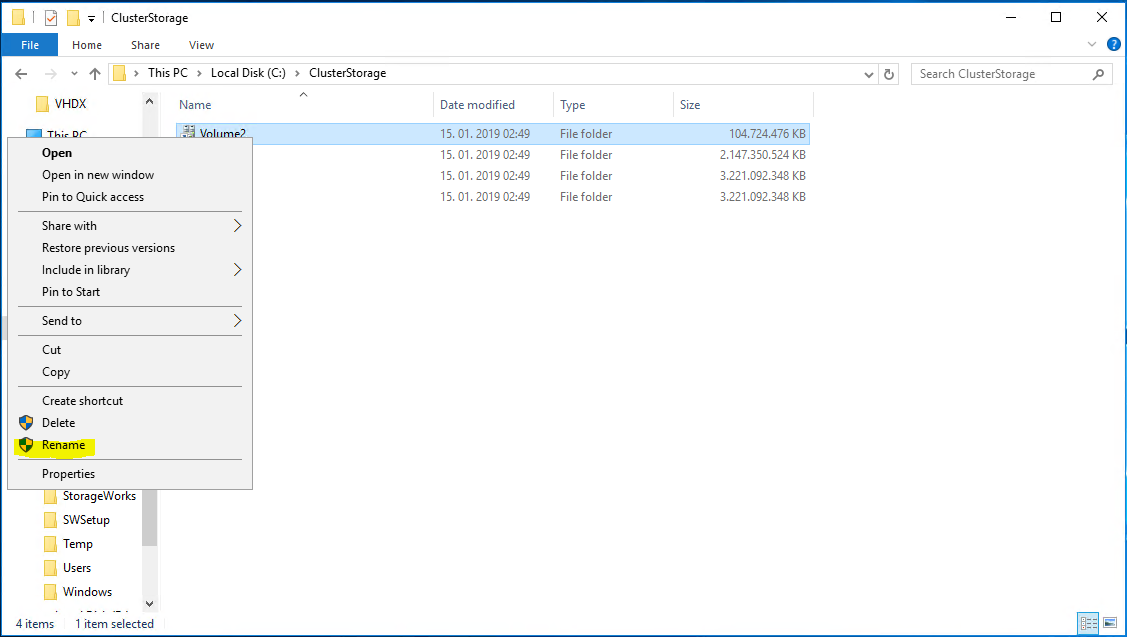
When you have your new volume, you can go to the File Explorer on the node which is the owner of this CSV and browse to C:\ClusterStorage. There you can see all the volumes (in my case Volume4, Volum5, Volume6 and Volume7). Now you can just rename Volume7 to Volume1 (same name that you have on the original location).

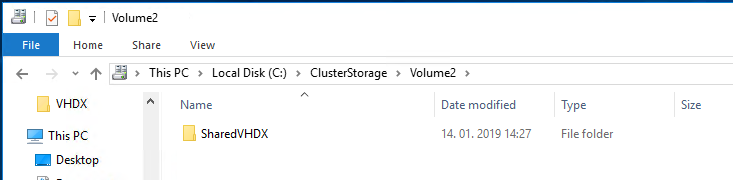
Last simple action you have to do is to create a folder with the same name as you had on the original volume.

The work is done, now you have exactly the same path as is specified in parameter. Live migrations are working. You don’t need to restart servers or cluster service or something else. You just need that path defined in ConfigStoreRootPath exists. In this path system will create some files and folders, but don’t worry about; you don’t need to copy the old data.

At the end, if you have enough space on CSV and free time, you can move all data from one volume to the other, rename that volume and move data back. You can do this volume by volume for all of them. It will not change the functionality, but in the end it will be nicer – you will have Volume1, Volume2 and Volume3 again.

How to establish VPN before Windows login

In some cases, you need to establish VPN before you login to Windows. As some VPN clients offer this method (not all of them, of course), I had a requirement to create this option with Windows build in client.
Here I found a trick; If you want to create VPN connection thru Windows settings, it will not appear on logon screen and this is not useful for me. If you create VPN thru network and sharing centre it is different – VPN connection appears on logon screen. Makes sense? No, but if you need it, is good to know how to configure it.
So, here you can follow the step by step instructions:

  • Open Control Panel
  • In Control Panel click View Network status and Tasks
  • In Network and Sharing Centre you will find a wizard to create a new VPN connection by clicking on Set up a new connection or network. It is almost the same as in other ways, but if you create VPN here, it will appear on the start screen. It is important, that you create VPN for all users!
  • On the Set up a Connection or Network wizard you have to choose Connect to workplace
  • On the next step you can use an existing VPN connection or create a new one. If you already have a VPN configured, you can just modify it. In my case I will create a new one (I prefer always to create a new connection). If I have an old configuration, I always delete it and recreate a connection from the scratch
  • On How do you want to connect, choose Use my Internet connection (VPN)
  • Write the name or IP of the VPN endpoint, destination name and do not forget to check Allow other people to use this connection. Then click on Create
  • If you want to do additional setting on this connection (specify protocol, add certificate …), you have to open the ncpa.cpl (Network Control panel) and from there you can review or change all settings you want

A connection done in this way will appear on logon screen and it is possible to establish VPN before you login in Windows.

Disable TLS 1.0 thru GPO

Lately I had a lot of problems with TLS 1.0 standards, which have changed. For a lot of secure applications you have to disable TLS 1.0, if you want the connection to work.
Well, set settings for any user it makes no sense and the only acceptable way it is thru GPO settings. There is no real setting for change-enabled protocol (you have to do it in Internet Explorer settings). The only way I found was changing the registry value of SecuredProtocol, located in HKEY_CURRENT_USER\Software\Microsoft\Windows\CurrentVersion\Internet Settings and HKEY_LOCAL_MACHINE\SOFTWARE\Microsoft\Windows\CurrentVersion\Internet Settings.
But here is only a numerical value and I had to find how is it calculated. I found some values in an article and from here you can calculate the desired value. The basic numbers are:
0 = Do not use secure protocols
2 = PCT 1.0
8 = SSL 2.0
32 = SSL 3.0
128 = TLS 1.0
512 = TLS 1.1
2048 = TLS 1.2
If you want to enable more protocols, just sum the desired numbers. For example, to enable TLS 1.1, TLS 1.2 and SSL 3.0 is 512 + 2048 + 32 = 2592. This is a decimal value for a registry key SecuredProtocol. Deploy a registry value true GPO and the setting is done.

Huge Intel chip bug – some advices

On January 4th, Intel processor vulnerability was published. It is a vulnerability that affects not only Microsoft systems, but also all other systems, including iOS, Android, Linux etc.

I won’t spend the same words as you can read them in many published articles about the vulnerability and how serious it is. I just want to share two links, where is it possible to find tools / patches for Microsoft systems:
https://support.microsoft.com/en-us/help/4072698/windows-server-guidance-to-protect-against-the-speculative-execution (PowerShell must be 5.1 or higher)

http://www.essential.exchange/2018/01/04/windows-speculative-execution-client-server-patches-mitigations-detection-summary/

https://github.com/MicrosoftDocs/Virtualization-Documentation/blob/live/virtualization/hyper-v-on-windows/CVE-2017-5715-and-hyper-v-vms.md


NIC Location on domain controller shows Public network

It could happen. I saw this issue couple of times, not only on domain controllers, but also on other domain joined computers.

The cause of this problem is the Network Location Awareness service. We know, that this service is recognising network location based on gateway and is trying to locate AD server thru port 389. Well, when gateway is changed or no server connection true port 389 is available, we have a new network location – by default it is Public.

Anyway, it can happened that NLA service starts before the AD services are started (or before DC is reachable on a non DC server). In this case, we will have public network profile on DC or domain joined computers. If firewall is enabled, most of network services will not run as the firewall for the Public profile is almost closed.
We have few possibilities to solve this situation. Maybe the most simple way is to restart the server, but I don’t know if I can restart the server at this moment and what was the original cause of the problem – maybe it will reappear. The second option is to disable / reenable the NIC adapter and in most cases, it will solve the issue. We will get the same result if we just restart the NLA service – this is a better way.
In some cases, you cannot connect to the computer for some reason. In this case, I use PowerShell remote session to solve the problem.

Here are the steps:
Enter-PSSession ComputerName (establish connection to computer with the problem)
Get-NetConnectionProfile (this will show you your current location profile – if this is the source of the problem, the location will not be Domain)
Restart-Service nlasvc (this cmdlet will restart NLA service; after this step you should see Domain network profile)
Get-NetConnectionProfile (just to check if the solution works)


Exit-PSSession (disconnect form the remote computer)

Based on my experience, this solution works always. Some administrators also suggest to change start option for NLA service to Automatic (Delayed Start). I am not sure if this is a good solution; be careful with it. Maybe you can do it in cases where this error is frequent (better: search for the original cause and solve the problem)