My top 10 in new Essentials server

What is new, cool and bad in Windows Server 2012R2 Essentials? I have my personal top 10 opinion. I don’t want to write only good thinks, because the administrator must know also the dark side of a product. Here is my list:

  1. Virtualization rights – Server 2012R2 Essentials license include virtualization rights that are different form normal, standard product. These rights include the virtualization 1 + 1. To be more specific, you don’t need to buy an additional license for the host server (if you want to have GUI), but you have to buy it for any additional VM. This will be useful for providing DR scenario in small companies with Hyper-V replica (for example to do it in our datacenter).
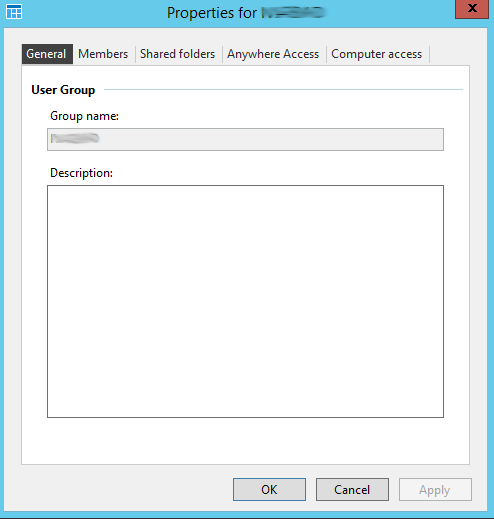
  2. AD Groups – Finally! Microsoft realizes, that user-by-user permissions are not a good approach even in small environments (especially in version 2012, where you were able to translate product to the standard version…). Now we can create groups directly in Dashboard and we can assign permissions to groups and add users to them. It’s fine. Like in the good, old SBS.AD Groups
  3. Essentials role in standard server – Microsoft adds Essentials role to standard products in the way, that if you buy Windows Server 2012R2 Standard or Datacenter edition, you will be able to install the Essentials role. This role will give an opportunity to use Dashboard, Remote Web Workplace and other Essentials functionality. You will be able to use one or more Essentials functionalities, but in some cases, you will be limited with a limit of 100 users (for example in client backups – another good point to limit usage!).Essential role
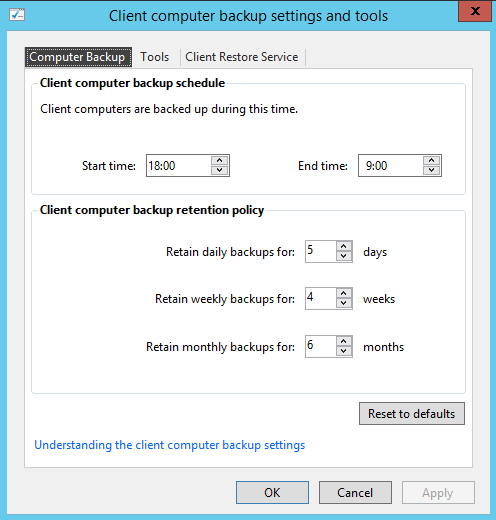
  4. Client computer backups – Good practice in small companies where you have users, that just use “Save” button and don’t matter where the data is going. This happens in many small companies and no one knows where the data is. In this cases, you have to backup all the environment, including client computers. Very useful functionality.Çlient backup settings
  5. Azure Backup – We talk again about small businesses. In many cases, the server is located under the table, security is something that they don’t think about and their data are exposed to high risk. Azure backup in those cases is a very good functionality to store crucial company data in a secure location. Of course, this is not a replacement for the normal server backup. We still need to backup our server, because Azure backup will not protect you against accidents like hardware failure or similar. In these cases, you will need a local backup to restore the server quickly.
  6. Remote Web Workplace – One of my favorite functionalities in Essentials or old SBS server. I use this functionality a lot, I talk a lot about it, but is still buggy. I mentioned this bug in my blog previously and I reported this bug to Microsoft when SBS 2011 public preview was released. From than the bug is still present, so be careful who will have the Administrator rights in your system. It is not really a good point to preserve private data.
  7. Internal “local” domain – by default is no chance to change FQDN domain from .local to any other domain name. This will be not smart after January 1st, when you will not be able to add local domain to trusted certificates and in many cases this is not a good idea to do it this way. The only way to move away from local domain is installing the Essential role with PowerShell (Break the Essentials wizard and run Start-WssConfigurationService -CompanyName “ContosoTest” -DNSName “ContosoTest.com” -NetBiosName “ContosoTest” -ComputerName “YourServerName” –NewAdminCredential $cred -Setting All from elevated PowerShell).
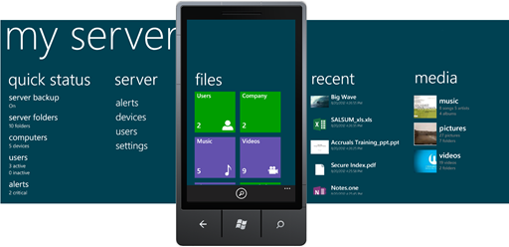
  8. Windows Phone and Windows 8 App – Both apps are present from version 2012, but I think, that is a nice approach to have easy access to all data on the server. It is also nice for administrators with quick status report for network. Nice thing.Windows Phone App
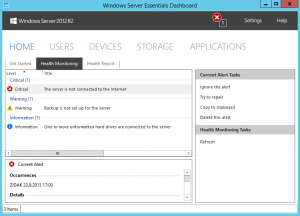
  9. Health Monitoring and reports – Another thing, that make SBS and Essentials servers popular and easy to manage. Very nice idea to have all events reported on the same screen. In this version is improved with some knowledge results for every error or warning. It is very useful for administrators. The other good functionality of Health monitoring is that it can send E-Mails with health reports and critical errors. One thing I would correct here is the schedule for generating reports; I would like these reports to be generated weekly, not hourly or daily. If you are administrator for more servers, there are too many mails with current configuration.Healt Management
  10. Launchpad – Nice application for not so expert users. I think that is very good to advice all users in small companies to use it, because it has a lot of good shortcuts. The first one is access to all shared folders on server without mapping them. This will solve administrator problems like “I cannot see Y drive”. The second nice thing is the list of errors and warnings; including disk space and update warnings. And the last, but not least, is the backup functionality. Unfortunately it is not so good, because a non administrator user can backup his machine, but he is unable to restore some files. This could be corrected.

I hope, that this list will give you a good opinion about this server. Honestly is not a bed product and it is very useful and easy to manage. It is dedicated to small companies and it is made with this logic. Consider it, test it and use it. You will be satisfied with it!.

About malware…

Frequently someone asks me for an advice which antivirus use, how to protect from the “viruses” and similar things. For this reason, I have decided to say some words about this on my blog.
A good antivirus software it is not all you need, above all, you need to control yourself. You have to avoid browsing on some not good internet pages, you have to avoid to install all software that you think “maybe will be useful”, in other words, work with computer responsibly and think of what can happen in advice.
Finally, think about all devices, that you have. It is not good to say “it is only tablet or phone”. This type of thinking has as a result a 614% grow of malware on Android devices in a year!
Also for the computer think what is going on. Now there is a Trojan malware where you have to answer on a survey!
And on “The Question” which antivirus software is good, I always avoid the response. The reason is simple: everyone of us has personal preferences and thinking. As a result of this, it is impossible to give the perfectly correct answer, but you can find Antivirus software tests here. This can give you a good view to find the right software..

Migrate from SBS 2008 or 2011 (Part 6)

Move the FSMO Roles from SBS Server

At this point the SBS Server holds all five FSMO. In order to demote the SBS Server, these roles must first be moved to another domain controller. They can be safely moved to any Domain Controller in the domain.

 
To transfer the FSMO roles, follow this steps:

  1. Click Start, click Administrative Tools and then click Active Directory Users and Computers.
  2.  If you are logged on SBS Server, right-click Active Directory Users and Computers and then click Change Domain Controller. If you are logged on the destination DC, you can go directly to step 4.
  3. In the Enter the name of another domain controller box, type the name of the server you want to transfer the roles to and then click OK.
  4. In the console tree, right-click Active Directory Users and Computers, point to All Tasks and then click Operations Master.
  5. Click the PDC tab and then click Change.
  6. Click OK to confirm that you want to transfer the role.
  7. Repeat steps 5 and 6 on the Infrastructure and RID tabs.
  8. Click Close to exit the dialog.
  9. Click Start, click Administrative Tools and then click Active Directory Domains and Trusts.
  10. In the console tree, right-click Active Domains and Trusts, point to All Tasks and then click Operations Master.
  11. To change the Domain naming operations master click Change and then click Close.
  12. Next, open an elevated command prompt and type the following command: Regsvr32 %systemroot%system32schmmgmt.dll
  13. Click on Start, click on Run and type MMC.
  14. In the MMC window click on File and then click on Add/Remove Snap-in…
  15. In the Add or Remove Snap-ins dialog click on Active Directory Schema, click Add and then click OK.
  16. Click Change Active Directory Domain Controller…
  17. Click to choose another DC in your forest and then click OK. Click OK to dismiss the warning dialog.
  18. Right-click on the Active Directory Schema and click Operations Master…
  19. Click the Change button. Click the Yes button when prompted to change the Operations Master.
  20. At the command prompt, type netdom query fsmo to verify that all the roles are now held by domain controllers, other than the SBS Server.


Uninstalling the Exchange Server
 

Now is time to uninstall the Exchange server from the SBS Server. Be careful, if you have installed ForeFront for Exchange Server. In this case you must first uninstall this product:
 

  1. Logon to SBS Server as Administrator.
  2. Click Start, click Run, then type Services.msc.
  3. Stop all the Exchange services.
  4. Click Start, click Control Panel, then select Programs and Features.
  5. Found Microsoft ForeFront Security for Exchange Server (if it is installed). Click Uninstall.
  6. Uninstall Microsoft ForeFront for Exchange Server.
  7. Restart the SBS Server.

The second thing that you must do is to create the registry key that enables you to remove the Exchange Server management tools:

  1. Click Start, click Run and then, in the Open text box, type regedit.
  2. Browse to HKEY_LOCAL_MACHINESoftwareMicrosoftExchangeV8.0AdminTools.
  3. From the Edit menu, click New and then click String Value.
  4. Type Type the name ConfiguredVersion.
  5. DoubleClick ConfiguredVersion and then, in the Value Data field, type the same value as the data value for the UnpackedVersion registry key, which is located in HKEY_LOCAL_MACHINESoftwareMicrosoftExchangeV8.0AdminTools.
  6. Close the registry Editor.


It could happen that you will also have to change manually the responsible server for OAB generation, remove public folders and change the source server for send connectors. This are the steps to control (change) this settings:

  1. To Change the source server for Send connectors:
    1. Click Start and then click Exchange Management Console.
    2. In tree view, on the left side, expand Organization Configuration, Hub Transport.
    3. In the result pane click Send Connector, then right-click on Windows SBS Internet Send connector and select Properties.
    4. Go to Source server tab and click Add…
    5. Select new Exchage server and click OK.
    6. Remove the SBS server from the list.
    7. Repeat the procedure for all the send connectors.
  2. Move the Offline Book generation to a new Exchange server (in case, that you don’t want to use public folders anymore, you must delete and create a new OAB).
    1. Open the Exchange Management Console.
    2. Expand Microsoft Exchange, expand Organization Configuration and then select Mailbox.
    3. In the results pane, click the Offline Address Book tab.
    4. On the Offline Address Book tab, select the offline address book you want to move. In the action pane, click Move.
    5. After the Move Offline Address Book Wizard appears, select the new server to host the offline address book generation by using the Browse button and then click Move.
    6. To close the wizard click Finish.
  3. Remove or move public folders. This steps are very clear explained on Microsoft Technet:
    1. For moving: http://technet.microsoft.com/en-us/library/bb331970(EXCHG.80).aspx
    2. For removing: http://technet.microsoft.com/en-us/library/bb201664(EXCHG.140).aspx

After this step, it is time to uninstall the Exchange server:

  1. Open Control Panel and then, in Programs, click Uninstall a program.
  2. On the Uninstall or change a program page, select Microsoft Exchange Server 2007 and then click Uninstall.
  3. In the Exchange Server 2007 Setup Wizard, on the Exchange Maintenance Mode page, click Next.
  4. On the Server Role Selection page, clear all of the server role check boxes and clear the Management Tools check box. Then click Next.
  5. On the Readiness Checks page, after the checks are finished, click Uninstall.
  6. On the Completion page, click Finish.

 
Demote the SBS Server and remove it from the domain

Log on to the Management Server as an administrator and follow this steps to remove the machine from the domain:

  1. Click Start, click Run and then type dcpromo.
  2. Click Next on the welcome screen.
  3. Click OK to dismiss the global catalog server warning.
  4. Click Next on the delete the domain screen.  Do not select the delete the domain because this server is the last domain controller in the domain check box.
  5. On the Remove DNS Delegation page, verify that the Delete the DNS delegations pointing to this server check box is selected and then click Next.
  6. When prompted, type a password for the local administrator account. Click Next.
  7. Click Next on the review screen to begin the demotion.
  8. Click the Reboot on completion check box.


After the machine has finished rebooting, remove it from the domain following this steps:

  1. Log on to the SBS Server as an administrator.
  2. Click on Start, right-click on Computer, then click on Properties.
  3. Click on Change settings.
  4. Select the Computer Name tab and click Change…
  5. Select Workgroup under Member of and enter a unique value for the workgroup name.
  6. Click OK and reboot when prompted.

Log on to the DC Server and verify that the DNS A record and computer account for the SBS Server have been successfully removed.

Migrate from SBS 2008 or 2011 (Part 5).

Migrate from SBS 2008 or 2011 (Part 5)

Transferring DHCP role to the new domain controller

The DHCP database and settings can be backed up to allow the replacement server to quickly take over the DHCP server role and service clients again. If DHCP is not running on the SBS server, you may skip this step. To back up the database, follow this steps:

  1. Open DHCP Management MMC by selecting Start, then All Programs, Administrative Tools, DHCP.
  2. In the console tree, select the SBS server.
  3. On the Action menu, click Backup.
  4. In the Browse For Folder dialog box select the folder where you want to store the backup DHCP database and then click OK.

To allow the new server to act as a DHCP server, you must install the DHCP Server role and then configure the server’s settings. This steps assume that you have backed up your SBS Server settings and will restore them to the new server. If you are hosting DHCP on another server, you may skip this step.

Install the DHCP Server Role

You can use this procedure to install and configure the DHCP Server role, using the Add Roles Wizard. Membership in Domain Admins or equivalent is the minimum required to perform this procedure.
 

To install DHCP

  1. Do one of the following:
    1. In Initial Configuration Tasks, in Customize This Server, click Add roles. The Add Roles Wizard opens.
    2. Click Start and then click Server Manager. In the left pane of Server Manager click Roles and in the details pane, in Roles Summary, click Add Roles. The Add Roles Wizard opens.
  2. In Before You Begin page click Next.
  3. In Select Server Roles, in Roles, select DHCP Server and then click Next.
  4. In DHCP Server click Next.
  5. In Select Network Connection Bindings, in Network Connections, select the IP addresses that are connected to the subnets for which you want to provide DHCP service and then click Next.
  6. In Specify IPv4 DNS Server Settings, in Parent Domain, verify that the name of the DNS domain that clients use for name resolution is correct. For example, if your domain is named example.com, verify that the DNS domain name is example.com.
  7. In Preferred DNS server IPv4 address, type the IPv4 address of your preferred DNS server, and then click Validate. In Alternate DNS server IPv4 address, type the IPv4 address of your alternate DNS server (if any) and then click Validate.
  8. Click Next. In Specify IPv4 WINS Server Settings select one of the following:
    1.  If you do not have WINS servers on your network, select WINS is not required for applications on this network.
    2. If one or more WINS servers are deployed on your network, select WINS is required for applications on this network. In Preferred WINS server IP address, type the IPv4 address of your preferred WINS server. In Alternate WINS server IP Address, type the IPv4 address of your alternate WINS server (if any) and then click Next.
  9. In Add or Edit DHCP Scopes click Add. The Add Scope dialog box opens.
  10. In the Add Scope dialog box type values for all required items and in Subnet Type select either Wired or Wireless, depending on the IP address lease duration that you prefer and then do one of the following:
    1. To automatically activate the scope immediately after DHCP installation is complete, click Activate this scope. If there are computers or devices on the network that have static IP addresses, do not activate the scope until you have created an exclusion range. The exclusion range prevents the DHCP server from leasing IP addresses that are already in use by a statically configured device.
    2. To manually activate the scope later, use the DHCP Microsoft Management Console (MMC).
  11. Click OK. This returns you to the Add or Edit DHCP Scopes page. If your network has multiple subnets that are serviced by this DHCP server, add scopes for each subnet using steps 9 and 10. Click Next.
  12. In Configure DHCPv6 Stateless Mode, select whether you want to configure the DHCP server for DHCPv6 stateless operation and then click Next.
  13. In Authorize DHCP Server, do one of the following:
    1. Select Use current credentials to authorize the DHCP server in Active Directory Domain Services (AD DS) using the credentials supplied for the current session.
    2. To specify alternate credentials for authorization, select Use alternate credentials. Click Specify and then type the credentials to use for DHCP server authorization.
    3. Select Skip authorization of this DHCP server in AD DS if you don’t want to autorise the server at this point and then click Next.
  14. In Confirm Installation Selections, review your selections, and then click Install.
  15. In Installation Results, review your installation results, and then click Close.


Restore from Backup

  1. Open DHCP Management MMC by selecting Start, then All Programs, Administrative Tools, DHCP.
  2. In the console tree, click the applicable DHCP server.
  3. On the Action menu click Restore.
  4. In the Browse For Folder dialog box select the folder that contains the backup DHCP database and then click OK.


Migrate from SBS 2008 or 2011 (Part 4)

Migrate from SBS 2008 or 2011 (Part 6).

Migrate from SBS 2008 or 2011 (Part 4)

Backup Exchange Data
 

Follow this steps to back up the data in Exchange using Windows Server Backup so it can be restored on the new server running Exchange Server 2007.  You are free to use another backup and restore solution, but that will not be covered in this document.  If you choose to use Windows Server Backup, you should have Exchange 2007 Service Pack 2 or later installed so that the Exchange backup plugin is registered. You will also need to install Exchange Server 2007 Service Pack 2 or later on the new server in order to have the Exchange backup plugin available for the restore.

Using Windows Server Backup
 

  1. Start Windows Server Backup.
  2. In the Actions pane, click Backup Once…. The Backup Once Wizard appears.
  3.  On the Backup options page select Different options and then click Next.
  4.  On the Select backup configuration page select the type of backup that you want and then click Next:
    1. Select Full server (recommended) to back up all volumes on the server.
    2. Select Custom to specify which volumes should be included in the backup. If you select this option, the Select backup items page appears. Select the volumes to be backed up and then click Next.
  5. On the Specify destination type page select the location where you want to store the backup and then click Next. If Remote shared folder is selected, the Specify remote folder page appears. Specify a UNC path for the backup files and then do one of the following, to configure Access Control settings:
    1. Select Do not inherit, if you want the backup to be accessible only by a set of specified user credentials and then click Next. Type user name and password for a user account that has write permissions on the computer that is hosting the remote folder and then click OK.
    2. Select Inherit, if you want the backup to be accessible by everyone who has access to the remote folder and then click Next.
  6. On the Specify advanced options page select VSS full backup and then click Next.
  7. On the Confirmation page review the backup settings and then click Backup.
  8. On the Backup progress page, you can view the status and progress of the backup operation.
  9. Click Close, when the backup operation is completed.

Using a file copy backup
Note: This step is recommended as a second backup of the Exchange data in the event you plan on migrating the Messaging server to the same hardware in the unlikely event you are unable to restore the Exchange data from your primary backup method after the server is reinstalled.

  1. Start the Exchange Management Console.
  2. Expand Server Configuration and click on Mailbox.
  3. On the Database Management tab make a note of all the Database File Paths for all the Databases listed.
  4. View the properties of every Storage Groups listed and make a note of every Log Path and System Path.
  5. Stop the Microsoft Exchange Information Store service.
  6. Make a backup copy of all folders you noted in steps 3-4 to removable media or a location that will not be formatted when the Exchange server is reinstalled later in this document.
  7. ?

Install the Exchange Server

Using a copy of 64-bit Windows Server 2008R2 Standard Edition, install a new server. The server should be joined to the domain manually as a member server. Once the server is installed, apply all the Windows Service Packs and updates.

There is no requirement that the Messaging Server should be a domain controller. If you have additional DCs, it is not recommended making this server a DC. 

 
Install Exchange and Migrate Data
To install the Windows Server 2008R2 operating system prerequisites, for a computer that will host the Hub Transport, Client Access, and Mailbox server roles, use the Powershell interface:

  1. In Start menu run PowerShell as Administrator.
  2. In PowerShell windows type Import-Module ServerManager.
  3. Wait for the command to be completed and then type Add-WindowsFeature NET-Framework,RSAT-ADDS,Web-Server,Web-Basic-Auth,Web-Windows-Auth,Web-Metabase,Web-Net-Ext,Web-Lgcy-Mgmt-Console,WAS-Process-Model,RSAT-Web-Server,Web-ISAPI-Ext,Web-Digest-Auth,Web-Dyn-Compression,NET-HTTP-Activation,Web-Asp-Net,Web-Client-Auth,Web-Dir-Browsing,Web-Http-Errors,Web-Http-Logging,Web-Http-Redirect,Web-Http-Tracing,Web-ISAPI-Filter,Web-Request-Monitor,Web-Static-Content,Web-WMI,RPC-Over-HTTP-Proxy -Restart. This command will install all prerequisites needed by a typical installation of Exchange. After the command will be complete, the server will restart.

Install Exchange Server 2010

  1. Download and install Microsoft Office 2010 Filter Packs from http://go.microsoft.com/fwlink/?LinkId=191548 .
  2. Install Exchange Server 2010 from a media or a downloaded copy by lunching setup.exe in the root folder on the Exchange DVD or extracted folder.
  3. In Introduction window click Next.
  4. In License Agreement window check I Accept the terms in the License agreement and click Next.
  5. In Error reporting window click Next.
  6. In Installation type window select Typical Exchange Server Installation, check Automatically install Windows Server roles and features required for Exchange and click Next.
  7. In Configure Client Access server external domain check The Client Access server role will be Internet facing.
  8. In Enter the domain name you will use with your external Client Access servers type the name of your MX record (for example: mail.contoso.com).
  9. Click Next.
  10. In Customer Experience Improvement Program click Next.
  11. In Readiness Check that all requisites are installed (all checkmark must be green) and click Install.
  12. Review that all tasks has completed successfully and click Finish.

In this time, you must change the firewall and the DNS setting. Now the new exchange is ready to receive and send mails. This will be possible after you change the forwarding roles on your firewall. You must change forwarding roles for ports 25, 80 and 443 to messaging server IP.

Some changes in DNS are also needed. To do this follow the procedure:

  1. Open Start menu, Administrative tools and lunch DNS.
  2. In the left pane expand SERVER_NAME, Forward lookup zones (Where SERVER_NAME is the name of the DNS Server).
  3. Expand EXERNAL_DOMAIN_NAME and select A Record for the name of remote access – by default is remote and right-click properties (INTERNAL_DOMAIN_NAME is the name of RWW).
  4. Change the IP address with the address of the new messaging server.

Creating data and migrating users to the new Exchange server
First step to do is creating a new Offline Address Book:

  1. Open Start menu and open Microsoft Exchange Management Shell as Administrator.
  2. Type the command New-Offlineaddressbook -name “OAB_NAME”default global address list” -server “SERVER_NAME” (where OAB_NAME is the name of Offline Address Book and SERVER_NAME is the name of Messaging server).
  3. After the new OAB is created, it must be updated with the command Update-OfflineAddressbook -Identity “OAB_NAME”.
  4. At this point we must set this OAB as default OAB for Mailbox Database on Messaging server with the command Get-MailboxDatabase | Set-MailboxDatabase –offlineaddressbook “OAB_NAME”.


After the database is ready, you can begin moving Mailbox Location with pipeline Get-Mailbox -Server SBS_SERVER | New-MoveRequest -TargetDatabase “NEW_DATABASE” (where SBS_SERVER is the name of the SBS Server and NEW_DATABASE is the name of the Mailbox database on Messaging server). During the move operation, user will be able to send and receive mails, but when the operation is completed, he will be prompted to restart Outlook.

At the end they remain only public folders. You can move them simply with a script from the new Exchange server:

  1. Open the Exchange Management Shell as Administrator.
  2. Navigate to the folder <Drive>Program FilesMicrosoftExchange ServerV14Scripts (where <Drive> is the system drive).
  3. Run a PowerShell script .MoveAllReplicas.ps1 -Server “SBS Server” –NewServer “New Server” (where “SBS Server” is the name of the SBS Server and “New Server” is the name of the new Exchange server).
  4. Wait few days, that all fodders will be moved completely.

Migrate from SBS 2008 or 2011 (Part 3)

Migrate from SBS 2008 or 2011 (Part 5)

 .