PowerShell license tips

Well as I know many users are trying to find Windows key with some key viewer software. Nothing wrong, but this software is not always “nice” and can do something else than just show you a key. Of course, with Windows 8.1 and Windows 10 you have many times a key in BIOS, so there is no need to search for it.
Anyway, if you feel better when you have a key printed on a piece of paper, you can do that simply with one PowerShell cmdlet:

Get-WmiObject -query ‘select * from SoftwareLicensingService’

This will show you more than only a key. There are a lot of information on licensing, like KMS server, OS version, … In some cases it can be useful.

WIndows 10 Annual update error 0xc1900200

I recently bought Minix Z83 mini PC and the first think I did was to upgrade it to the latest version of OS. Unfortunately, I received immediately an upgrade error with a code 0xc1900200. This means that UEFI partition on the disk is too small. It should be at least 350MB, but deployed size is 64MB.
Well, no problem, you have just to resize the partition and this is very simple. I use a tool named EaseUS Partition Master, which gave me very good results everywhere. But there was a second disappointment: I was not able to move or resize the partition “Other” with size 16MB and in Minix forums there is no explanation what this partition is used for or if I can delete it.
I did some research what to do with current file system, why we have an additional partition and finding some answers I decided to delete this 16MB partition.
So, my steps to solve the problem were:

  • Install and start EaseUS Partition Master
  • Resize the system partition (C:) in a way to reduce size for 270MB and apply free space in a front of partition
  • Restart the computer (EaseUS needs to restart a computer to apply changes on system partition)
  • Start EaesUS Partition Master again
  • Delete the partition with the size 16MB
  • Resize UEFI partition to 350MB
  • Apply all changes (You can see the final situation on the image)
  • Close EaseUS Partition Master and restart the computer
  • Update Windows with Windows 10 Upgrade Assistant.


This step will guarantee you to upgrade your OS to the latest version and avoid problems in the future. The steps are valid also for other systems and other configurations, but be careful when you have more than only needed partitions. Any additional partition is there for some reason and is better to find why before you remove or resize it.

Creating VM start order in Hyper-V Cluster 2016

Many times (or almost always), you have to define start order of VMs as services on one VM in an exactly defined order. We tried to solve this problem with start delays in the past – or with some additional software, but there were always situations where we are unable to control all factors.
Now in Windows Server 2016 edition it is better, as we can define startup groups. This means, that we define a group of servers who will start together and another group of servers who will start later when the first group is started or also with some delay after the first group is started. Additionally, we can start just a last group of servers and because this group depends on other groups, system will first start the parent server group. So, you are not able to start some servers before all infrastructure depends on it is started. We have new cmdlets in PowerShell to define and manage Cluster Groups (you can list them with Get-Command -Noun *ClusterGroup*).


To do these settings, you have to know some concepts that are introduced in Windows Server 2016 and we will use them.

  • This post explains how to create groups in Hyper-V cluster; it will not work on non-clustered servers. If you want to setup startup order for a single Hyper-V host, this is the post where you can find how to do it.
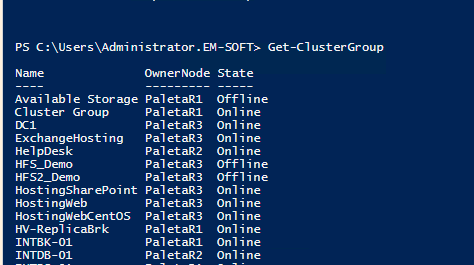
  • Cluster Group: Represents clustered services or applications (resource groups) in a failover cluster – any HA VM has his group. You can view cluster groups with PowerShell cmdlet Get-ClusterGroup. You don’t need to change anything here; just leave them as they are.
  • Cluster Group Set: Is a set of Cluster groups (VMs) that we want to control together. This is a set of VMs that have similar services and we want to control them as a group. Here we can control some settings (startup delay, global or local, …). Cmdlet we have to use at this point is Set-ClusterGroupSet (cmdlet syntax)
  • Cluster group set dependency: Is a dependency where we specify which group and when it will start. To be clear, with dependency we define VM startup order.

How to setup environment?
I always start creating output with cmdlet Get-ClusterGroup, because it is easier to manage all VMs when I have all their names on a paper or TXT file. It is easier to review them, define services that they offer and later functionally define group sets.
When you have defined group sets (put VMs with similar services or dependencies together) it is time to create Cluster Group Sets. This operation is done in few steps:

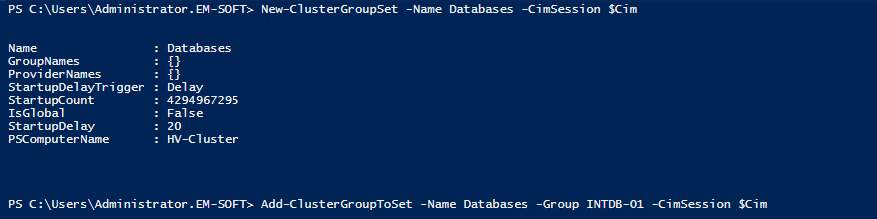
  • Create Cluster Group Set: this will create an empty group for grouping VMs. To do this you have to use cmdlet New-ClusterGroupSet -Name GroupName.
  • Add Cluster Groups (VMs) to sets. In this step, we will populate Cluster Group Sets with VMs – this mean that we will put together all VMs with similar services or VMs that we need to start at the same time. When Cluster Group Set will be asked to start, all VMs that are in it will be started. There is no dependency inside the Cluster Group Set and we have no chance to control the start order inside the group. If we think that some VMs need to start before other VMs, we need more than one Cluster Group Set. To add VM to Cluster Group Set we will use PowerShell cmdlet Add-ClusterGroupToSet -Name GroupName -Group ClusterGroupName. In this cmdlet, you have to change GroupName with your Cluster Group Set name and ClusterGroupName with Cluster Group name (VM name – output in firs step). We have to repeat cmdlet for every single VM.
  • Create dependency between Cluster Group Sets: We have to use cmdlet Add-ClusterGroupDependency -Group GroupName -ProviderSet GroupDependsOn. GroupName is the name of the Cluster Group Set we want to start and GroupDependsOn is a Cluster Group Set necessary to be started previously. At this point we need to create startup order (dependency) between groups. The start of any group can depend on successful start of one or more groups. If previous group will fail to start, the group who depends on it will not start. I suggest you to have in mind this situation (maybe develop a script to add and remove all VMs from groups – you will quickly solve problems if they appear).

With this few steps, we created a startup order for our environment. If it is all OK, we will never have a situation when a service will not work because some dependency server is not started. Practically, the system will look to start all VMs in a defined order. This also means, that we have to add and remove depreciated and newly deployed VMs in this groups – we have to change this mechanism every single time we change our environment. Don’t forget it.

Windows Server Essentials with Let’s Encrypt certificate

Many administrators in small environments (where we have Essentials server) have to buy a trusted certificates to make RWW working. The common problem of all those environments is, that there is no money for buying certificates or owners don’t understand why they need to buy certificates. This is why I am writing a post how to certify RWW with Let’s encrypt certificates.
It is a bit different to do it because Let’s encrypt certificates have validation period only three months and maybe it seems, you will have a lot of work – but don’t be afraid; we have two ways to simplify this procedure and my preferred procedure is with a product called Certify.

  • First download Certify from this link (https://certify.webprofusion.com/).
  • Install Certify with default options as you can see on screen shots. There is no need to change any settings; the application is simple and can be always installed with default options.

  • Now you have to modify Essentials server configuration. Certify can issue the certificate banded to name of default web site in IIS. This means that we have to modify default site bindings (look at picture) in a way that we have public RWW name bind to default web site and port 80 – 443 SSL is not needed.

  • For the first time, when you enter Certify, you will need to add your contact details. It is just to care about your certificates.

  • Open Certify and start registering the new certificate.

  • From the form select default web site and clear checkbox from local server name.
  • CLick Save.
  • Click Request certificate. At this point you will receive the certificate – be careful on firewall rules; you need to open port 80 and 443.

  • We have now to do the last step: go to Configure Auto Renew and type Username and Password for user who is able to request the certificate.

That’s all you need. Now you have configured RWW with free trusted certificate, the certificate will be renewed automatically when will expire and you don’t need to manually renew it anymore.
The same process can be done on any IIS website or for any certificate that could be requested thru IIS.

WIndows Server 2016 and Sync Host

Many administrators (including me) are not happy with two services in Server 2016. This services are OneSyncSvc (synchronizes mail, contacts, calendar and various other user data) and Download Maps Manager (for application access to downloaded maps) and are really not critical on server OS.


This is the reason why, you can disable them in almost all cases without any deep research. Anyway, when you try to disable OneSyncSvc from services console, you will receive an error, as this service cannot be disabled. At this point, use a trick and disable both services form elevated command prompt using commands:
sc config “OneSyncSvc” start= disabled
sc config “MapsBroker” start= disabled
Of course, before you run this commands, services have to be stopped, otherwise you will receive an error. You can do this also from command prompt:
sc stop “OneSyncSvc”
sc stop “MapsBroker”
This two simple commands will put services into startup type “disabled” and errors in Server Manager that are related to non-running services will disappear. Problem solved.

WP to LinkedIn Auto Publish Powered By : XYZScripts.com