NIC Location on domain controller shows Public network

It could happen. I saw this issue couple of times, not only on domain controllers, but also on other domain joined computers.

The cause of this problem is the Network Location Awareness service. We know, that this service is recognising network location based on gateway and is trying to locate AD server thru port 389. Well, when gateway is changed or no server connection true port 389 is available, we have a new network location – by default it is Public.

Anyway, it can happened that NLA service starts before the AD services are started (or before DC is reachable on a non DC server). In this case, we will have public network profile on DC or domain joined computers. If firewall is enabled, most of network services will not run as the firewall for the Public profile is almost closed.
We have few possibilities to solve this situation. Maybe the most simple way is to restart the server, but I don’t know if I can restart the server at this moment and what was the original cause of the problem – maybe it will reappear. The second option is to disable / reenable the NIC adapter and in most cases, it will solve the issue. We will get the same result if we just restart the NLA service – this is a better way.
In some cases, you cannot connect to the computer for some reason. In this case, I use PowerShell remote session to solve the problem.

Here are the steps:
Enter-PSSession ComputerName (establish connection to computer with the problem)
Get-NetConnectionProfile (this will show you your current location profile – if this is the source of the problem, the location will not be Domain)
Restart-Service nlasvc (this cmdlet will restart NLA service; after this step you should see Domain network profile)
Get-NetConnectionProfile (just to check if the solution works)


Exit-PSSession (disconnect form the remote computer)

Based on my experience, this solution works always. Some administrators also suggest to change start option for NLA service to Automatic (Delayed Start). I am not sure if this is a good solution; be careful with it. Maybe you can do it in cases where this error is frequent (better: search for the original cause and solve the problem)

Windows Server Essentials with Let’s Encrypt certificate

Many administrators in small environments (where we have Essentials server) have to buy a trusted certificates to make RWW working. The common problem of all those environments is, that there is no money for buying certificates or owners don’t understand why they need to buy certificates. This is why I am writing a post how to certify RWW with Let’s encrypt certificates.
It is a bit different to do it because Let’s encrypt certificates have validation period only three months and maybe it seems, you will have a lot of work – but don’t be afraid; we have two ways to simplify this procedure and my preferred procedure is with a product called Certify.

  • First download Certify from this link (https://certify.webprofusion.com/).
  • Install Certify with default options as you can see on screen shots. There is no need to change any settings; the application is simple and can be always installed with default options.

  • Now you have to modify Essentials server configuration. Certify can issue the certificate banded to name of default web site in IIS. This means that we have to modify default site bindings (look at picture) in a way that we have public RWW name bind to default web site and port 80 – 443 SSL is not needed.

  • For the first time, when you enter Certify, you will need to add your contact details. It is just to care about your certificates.

  • Open Certify and start registering the new certificate.

  • From the form select default web site and clear checkbox from local server name.
  • CLick Save.
  • Click Request certificate. At this point you will receive the certificate – be careful on firewall rules; you need to open port 80 and 443.

  • We have now to do the last step: go to Configure Auto Renew and type Username and Password for user who is able to request the certificate.

That’s all you need. Now you have configured RWW with free trusted certificate, the certificate will be renewed automatically when will expire and you don’t need to manually renew it anymore.
The same process can be done on any IIS website or for any certificate that could be requested thru IIS.

WannaCrypt Malware

Of course you have heard about the new malware, which yesterday created a lot of problems in industry. Unfortunately it is not an unknown problem.
Microsoft released a patch for this type of vulnerability already in March, but it seems once again that administrators are not patching their systems.
So, if you haven’t patched your systems at least every month, if you haven’t patched your system from March, is time to do it. And don’t forget to have a good defense system (antivirus and other prevention mechanisms). Update them to!
You can find additional information in this link.

Here is a link to post how was neutralized and who did this.
Anyway, we have already a version 2.0; you can read about this version here.
Again, please patch your systems! This update will solve a vulnerability. And don’t forget: this is not the first malware who was written on known vulnerability – patch your systems constantly!
Additionally, please disable SMB1 protocol – it is not new that it is not secure. Here and here are some guidelines how to do it via GPO.

Export and import DHCP settings with netsh

Sometimes you will have to transfer DHCP settings via netsh command. This could be useful for a couple of reasons and it is fine to know how to approach it. Anyway, this is the quickest way to do a DHCP migration.
First you have to login to source server (it could be also a failover clustered DHCP service) and open CMD as Administrator. Then you have to enter in netsh mode with typing:
netsh
Now you have to select server with typing:
dns server \\servername
Where servername is the name of the old DHCP server or clustered service name. This will connect you to DHCP server and you are ready to export settings with this command:
export filename all        to export the entire configuration or
export filename 192.168.222.0    to export only a scope configuration (in my case 192.168.222.0)
Of course, you have to replace the filename with full path and name of the file where you want to save exported data. This file now must be transferred to target – new server and we are ready to import the configuration. Of course, priory you import the configuration, the new server has to be authorized in AD. To begin an import procedure, we have to do the same steps as on the old server; open command prompt, enter into netsh mode and select DHCP server. After this, we have just a step to import settings with this command:
Import filename all        to import all settings or
Import filename 192.168.222.0    to import just a scope
That’s all. Just be sure to double-check if the import did its job, disable and unautorize the old server (you can do it also with netsh: netsh dhcp delete server ServerIP). Of course, don’t forget to uninstall the service on the old computer.
You have finished. Good work!

Cryptolocker…

Everyone of us want to stop Cryptolocker and similar programs. It seems that it is really a nightmare for all admins. Anyway, to stop Cryptolocker and any unwanted program, you have to be aware, that this will bring limitations to your system, which are not always welcome.

How does Cryptolocker work?
We have 5 phases of Cryptolocker infections:

  1. Installation: The software is delivered to your computer via download or E-Mail attachment and the user click on it. The executable is now installed, the registry keys are set and we are ready to go to the next phase.
  2. Contacting headquarters: the computer is contacting criminal headquarters for registration, so it will prepare all environment for phase 3.
  3. Creating keys: headquarter and client are now identifying each other and are ready to “handshake” and create two keys for encryption.
  4. Encryption: Cryptographic keys are now established and the encryption can begin. It depends on version, but almost all files on all local and shared drives where you have permissions will be encrypted.
  5. Extortion: The screen with a guide how much and where to pay is displayed. There is displayed also how much time you have for payment. If you will not pay in time, the headquarter key will be deleted and you will not be able to decrypt files. The payment is every day higher – so if you want to pay, do it immediately.

To prevent a large number of unwanted software, the first step to do is always remove LocalAdmin permissions and turn on UAC. This two actions will put you in situation where user will not be able to install any application and write to system crucial folders. Also have your system always up to date. And I don’t mean only OS, but include all applications installed (we know attacks to Java, Adobe FlashPlayer, Microsoft Office…).
Of course this is not enough as a lot of bed guys know how to elevate permissions or are using different folders (for example AppData is used for Cryptolocker), but been a LocalAdmin is a great way to become a victim. I suggest to all home users and system administrators to use two different accounts – one for daily use and the second for administrator tasks.
Well, the real way to prevent Cryptolocker is blocking the execution of exe files in AppData folder. You can do this with group policy in AppLocker or in software restriction policy. This are steps for basic protection with AppLocker:

  1. Create new GPO for Cryptolocker prevention
  2. Edit new created GPO
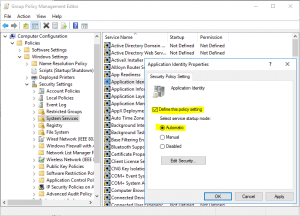
  3. Expand Computer configuration > Policies > Windows Settings > Security settings > System Services
  4. Enable “Application Identity” service and set it to automatic startup modeCrypto1
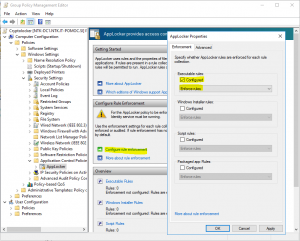
  5. Go down to Application Control Policies and expand to AppLocker
  6. In “Configure role enforcement enable Executable rules and make them in Enforce mode (I suggest you, to run them in Audit mode for week or two and analyze logs before enforcing them – just to find legal applications which can be blocked)Crypto2
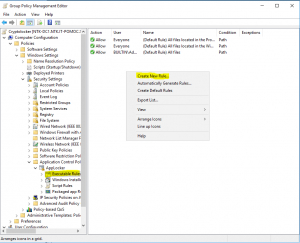
  7. Expand AppLocker and click to Executable rules
  8. Right click in action pane and create Default Rules
  9. Right click in action pane and create New RuleCrypto3
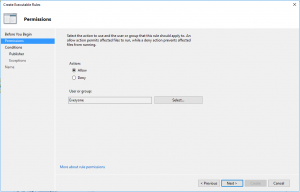
  10. In Permissions on Action set Allow for EveryoneCrypto4
  11. In Conditions select that is Publisher ruleCrypto5
  12. In Publisher, just browse one file (in my case was Internet Explorer) and go with slider up to Any publisherCrypto6
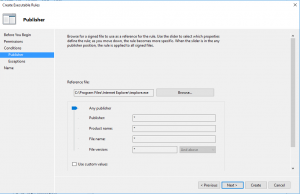
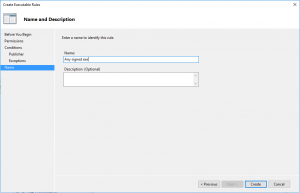
  13. Give the name to the ruleCrypto7

So, this is about AppLocker, but we have still a lot of work to do. There is a big surface for attack if users are local admin. To prevent this, configure Restricted groups in GPO by using Computer Configuration > Policies > Windows Settings > Security settings > Restricted Groups.
Apply this GPO to all computers and the first step is done.
GPO is a good way to prevent Crypto, but be aware that Crypto is evolving and you have to evolve with him. And preventing Crypto with GPO means that executable is already in your system – maybe you have to prevent it before is downloaded or received with mail. For this step you will need the application firewall, good antivirus in file system and in mailing system.
But still you can do something with chip devices with closing outgoing ports 83, 846, 777, 997, 1604, 9001, 9003, 444, 9052, 8443, 7777, 9003 and 25254. This ports are used to communicate with headquarter servers to obtain a certificate for encryption (maybe exist also other ports or will be added / changed during the time). If you will close this ports, the system will not be able to retrieve a certificate for encryption and the encryption will not be able to begin. Be careful on notebooks because the users will bring their notebooks at home and the encryption will be successful.
As you can see, there are a lot of ways to prevent Cryptolocker, but you have to prevent it. When you have it, it is too late – think about it now!

And for home users? Well we cannot forget them. They have a lot of pictures and documents on their computers – practically a whole life and is a really big impact to lose all this material.
I suggest you a software from FoolishIT. It is free and it is working good (but if you want to keep it up to date, give those few Euros to the author – he is doing his job well!).


Additional reading:
https://blogs.technet.microsoft.com/mmpc/2015/01/13/crowti-update-cryptowall-3-0/
http://www.crowdstrike.com/blog/4-0-another-brick-in-the-cryptowall/
http://researchcenter.paloaltonetworks.com/2015/02/analysis-cryptowall-3-0-dyre-i2p/
https://tools.cisco.com/security/center/viewAlert.x?alertId=36338