NIC Location on domain controller shows Public network

It could happen. I saw this issue couple of times, not only on domain controllers, but also on other domain joined computers.

The cause of this problem is the Network Location Awareness service. We know, that this service is recognising network location based on gateway and is trying to locate AD server thru port 389. Well, when gateway is changed or no server connection true port 389 is available, we have a new network location – by default it is Public.

Anyway, it can happened that NLA service starts before the AD services are started (or before DC is reachable on a non DC server). In this case, we will have public network profile on DC or domain joined computers. If firewall is enabled, most of network services will not run as the firewall for the Public profile is almost closed.
We have few possibilities to solve this situation. Maybe the most simple way is to restart the server, but I don’t know if I can restart the server at this moment and what was the original cause of the problem – maybe it will reappear. The second option is to disable / reenable the NIC adapter and in most cases, it will solve the issue. We will get the same result if we just restart the NLA service – this is a better way.
In some cases, you cannot connect to the computer for some reason. In this case, I use PowerShell remote session to solve the problem.

Here are the steps:
Enter-PSSession ComputerName (establish connection to computer with the problem)
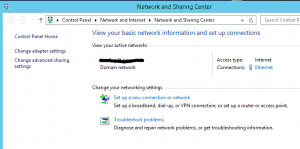
Get-NetConnectionProfile (this will show you your current location profile – if this is the source of the problem, the location will not be Domain)
Restart-Service nlasvc (this cmdlet will restart NLA service; after this step you should see Domain network profile)
Get-NetConnectionProfile (just to check if the solution works)


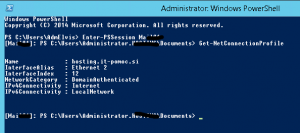
Exit-PSSession (disconnect form the remote computer)

Based on my experience, this solution works always. Some administrators also suggest to change start option for NLA service to Automatic (Delayed Start). I am not sure if this is a good solution; be careful with it. Maybe you can do it in cases where this error is frequent (better: search for the original cause and solve the problem)

WannaCrypt Malware

Of course you have heard about the new malware, which yesterday created a lot of problems in industry. Unfortunately it is not an unknown problem.
Microsoft released a patch for this type of vulnerability already in March, but it seems once again that administrators are not patching their systems.
So, if you haven’t patched your systems at least every month, if you haven’t patched your system from March, is time to do it. And don’t forget to have a good defense system (antivirus and other prevention mechanisms). Update them to!
You can find additional information in this link.

Here is a link to post how was neutralized and who did this.
Anyway, we have already a version 2.0; you can read about this version here.
Again, please patch your systems! This update will solve a vulnerability. And don’t forget: this is not the first malware who was written on known vulnerability – patch your systems constantly!
Additionally, please disable SMB1 protocol – it is not new that it is not secure. Here and here are some guidelines how to do it via GPO.

Export and import DHCP settings with netsh

Sometimes you will have to transfer DHCP settings via netsh command. This could be useful for a couple of reasons and it is fine to know how to approach it. Anyway, this is the quickest way to do a DHCP migration.
First you have to login to source server (it could be also a failover clustered DHCP service) and open CMD as Administrator. Then you have to enter in netsh mode with typing:
netsh
Now you have to select server with typing:
dns server \\servername
Where servername is the name of the old DHCP server or clustered service name. This will connect you to DHCP server and you are ready to export settings with this command:
export filename all        to export the entire configuration or
export filename 192.168.222.0    to export only a scope configuration (in my case 192.168.222.0)
Of course, you have to replace the filename with full path and name of the file where you want to save exported data. This file now must be transferred to target – new server and we are ready to import the configuration. Of course, priory you import the configuration, the new server has to be authorized in AD. To begin an import procedure, we have to do the same steps as on the old server; open command prompt, enter into netsh mode and select DHCP server. After this, we have just a step to import settings with this command:
Import filename all        to import all settings or
Import filename 192.168.222.0    to import just a scope
That’s all. Just be sure to double-check if the import did its job, disable and unautorize the old server (you can do it also with netsh: netsh dhcp delete server ServerIP). Of course, don’t forget to uninstall the service on the old computer.
You have finished. Good work!

Using FSRM against Ransomware

Every administrator is afraid about Ransomware software. We want to protect our systems with so many different approaches and at many layers, but almost always we try to use complicate techniques to archive basic objectives. I found on TechNet an article, which sounds good for me and I am also confidential using Windows embedded functionalities for trying to prevent an attack.
Are there positive and negative sides? Of course they are, the most important negative thing I recognize is that we are using technology based on file type. Actually we are trying to prevent to write all known file extensions that can be written on our system. This will work if we know the extension and we have to search for new used file extensions and add them as blocked file types. But there are also positive things: we don’t need to buy anything, we have all we need ready on our server – we have just to use it! It is very simple to configure and maintain and it works!
When I read this article, I was surprised why I have to do all those steps thru GUI? We can simply use PowerShell that is quicker and it will do exactly the same things every time we will start it. Well, I made a script that you can run on every server you have to protect and for every share or partition you want to protect. There is only one think that you cannot protect: system drive if you try to prevent whole drive. In this case, the protection will be passive and not active and there is no way to change it (but I hope that you don’t share system drive).
Things that you have to know are basic, just few data:
  • Path to protect
  • SMTP server for sending mail (and be careful with authentication! Test it!)
  • Mail address form which mail will be sent
  • Mail address from administrator
  • Script that you want to run after detection (if you want)
You can run it as many times you want, on every server you want (version 2008 and newer) and you will be able to protect your data. It is a secure way to do it because you just prevent to change the data transformation and not the malware itself. I recommend also to use a script published on TechNet article for disabling the AD user or deny user access to server (It is also zipped into my file; including subinacl.msi).
To prevent malware, you can use an additional build in function: AppLocker and also this is explained here. And by the way, the approach is tested on Server 2016 TP5 – it’s working!
Enjoy!

Forgot ILO Password?

No problem. You can reset it via software from your operating system. It is possible to do it from almost any Windows server system and from Linux (from Linux I didn’t try).
To do this, you have to install HP Lights-Out Online Configuration Utility for the system that you are using. You can download it form HP web page, where the drivers are located.
After you have installed this software, you will need a XML file with this content:

<ribcl VERSION=”2.0″>
 <login USER_LOGIN=”Administrator” PASSWORD=”boguspassword”>
   <user_INFO MODE=”write”>
    <mod_USER USER_LOGIN=”Administrator”>
     <password value=”YourNewPassword”/>
    </mod_USER>
   </user_INFO>
 </login>
 </ribcl>

I know, that the login password (the old one) is not correct, but you don’t need to know it (scary…), it will work.
Save this file into the folder C:\Progam Files\HP\hponcfg and launch the command prompt as Administrator. Navigate to the folder and type:
Hponcfg /f YourFile.xml /l YourLogFile.txt
You will be noticed that script worked correctly. Now you have just to login into ILO with the new password.
Easy to do it. Maybe too easy.

More reading:
Export ILO configuration

ILO Scripting guide.